Angular 8 OAuth 2 Authorization Code Flow with PKCE
Introduction
In this tutorial we will create an Angular application that authenticates using Authorization Code flow with PKCE. PKCE stands for Public Key Code Exchange and is useful authentication code flow when you know it is not safe for the app to store the client secret such as SPAs (Single Page Apps).
Setup
To generate a new Angular project you can run this command.
ng new myapp --routing
Run this command to install the necessary packages.
npm install angular-2-local-storage crypto-js @types/crypto-js --save
The first package angular-2-local-storage will be used to store the state and code_verifier. These values will be used to get the access token after the authorization server redirects back to your app.
code_verifier will be hashed using crypto-js Base 64 encoding and SHA256 hashing to create a code_challenge. @types/crypto-js is just the typescript definition files for crypto-js.
Now we can import the modules that we will need namely HttpClientModule and LocalStorageModule.
src\app\app.module.ts
import { BrowserModule } from '@angular/platform-browser';
import { NgModule } from '@angular/core';
import { HttpClientModule } from '@angular/common/http';
import { LocalStorageModule } from 'angular-2-local-storage';
import { AppRoutingModule } from './app-routing.module';

import { AppComponent } from './app.component';
import { HomeComponent } from './components/home/home.component';
import { AuthComponent } from './components/auth/auth.component';

@NgModule({
    declarations: [
        AppComponent,
        HomeComponent,
        AuthComponent,
    ],
    imports: [
        BrowserModule,
        AppRoutingModule,
        HttpClientModule,
        LocalStorageModule.forRoot({
            prefix: 'tutorial',
            storageType: 'localStorage'
        })
    ],
    providers: [],
    bootstrap: [AppComponent]
})
export class AppModule { }
We also have some environment variables that we will access in other files.
src\environments\environment.prod.ts
export const environment = {
    production: true,
    oauthClientId: '4',
    oauthLoginUrl: 'http://api.tutorial.test/oauth/authorize',
    oauthTokenUrl: 'http://api.tutorial.test/oauth/token',
    oauthCallbackUrl: 'http://localhost:4200/oauth/callback',
};
Redirecting to Authorization Server to Login
The login URL for Authorization Server will need a state, code_verifier, and code_challenge parameter which are random strings. There are a number of ways to generate a random string and here is one we can use.
You can put this to any files where you login. For this tutorial we have a login link in the header which is accessible to the app.component.ts.
src\app\app.component.ts
private strRandom(length: number) {
    let result = '';
    const characters = 'ABCDEFGHIJKLMNOPQRSTUVWXYZabcdefghijklmnopqrstuvwxyz0123456789';
    const charactersLength = characters.length;
    for (let i = 0; i < length; i++) {
        result += characters.charAt(Math.floor(Math.random() * charactersLength));
    }
    return result;
}
Next is to write another method that generates the login URL and redirects to it.
src\app\app.component.ts
goToLoginPage() {

    const state = this.strRandom(40);
    const codeVerifier = this.strRandom(128);

    this.storage.set('state', state);
    this.storage.set('codeVerifier', codeVerifier);

    const codeVerifierHash = CryptoJS.SHA256(codeVerifier).toString(CryptoJS.enc.Base64);

    const codeChallenge = codeVerifierHash
        .replace(/=/g, '')
        .replace(/\+/g, '-')
        .replace(/\//g, '_');

    const params = [
        'response_type=code',
        'state=' + state,
        'client_id=' + environment.oauthClientId,
        'scope=read_user_data write_user_data',
        'code_challenge=' + codeChallenge,
        'code_challenge_method=S256',
        'redirect_uri=' + encodeURIComponent(environment.oauthCallbackUrl),
    ];

    window.location.href = environment.oauthLoginUrl + '?' + params.join('&');
}
In this method we first generate random strings for state and code_verifier and store it to the browser’s local storage. We then hashed the code_verifier using SHA256 and encode to Base 64. Before passing this value as code_challenge, we must first remove the “=” from the Base 64 string and replace “+” and “\” to “-” and “_” respectively if there are any.
Make sure that redirect_uri is the same URI saved for the client_id.
After that we have an array of query parameters needed by the authorization server and redirect to it. We can now use this method in our HTML.
src\app\app.component.html
<a class="nav-link"
   (click)="goToLoginPage()">Login</a>
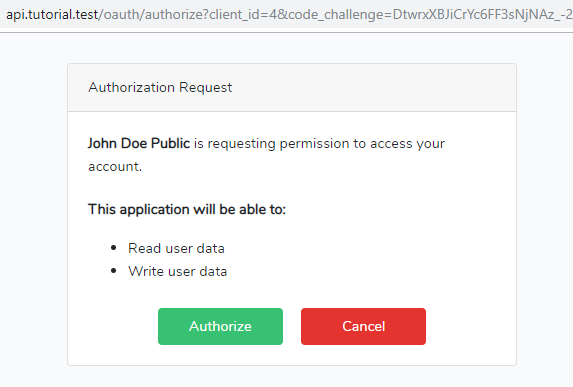
Now clicking the link will redirect to a URL like this.
http://api.tutorial.test/oauth/authorize?client_id=4&code_challenge=DtwrxXBJiCrYc6FF3sNjNAz_-24_WD1AEK0OYyqShE8&code_challenge_method=S256&redirect_uri=http%3A%2F%2Flocalhost%3A4200%2Foauth%2Fcallback&response_type=code&scope=read_user_data%20write_user_data&state=aJeTxvqipKE9iYZAyuXaHcd1CFhiS3u0r5gordn4
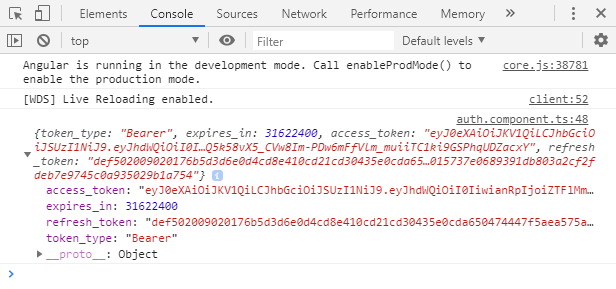
Here are some screenshots.
The “Authorize” button will redirect back to the Angular app with a query parameter code that we can use to get an access token.
Getting an Access Token
We will need to create our callback URL. You can run this command to generate a component that we will use to handle it.
ng generate component auth
Then we can update the routing module and add a new path 'oauth/callback' using AuthComponent that we just generated.
src\app\app-routing.module.ts
import { NgModule } from '@angular/core';
import { Routes, RouterModule } from '@angular/router';
import { HomeComponent } from './components/home/home.component';
import { AuthComponent } from './components/auth/auth.component';

const routes: Routes = [
    { path: '', component: HomeComponent },
    { path: 'oauth/callback', component: AuthComponent },
];

@NgModule({
    imports: [RouterModule.forRoot(routes)],
    exports: [RouterModule]
})
export class AppRoutingModule { }
When AuthComponent loads, we can do a couple of things.
First check the state query parameter against the store state in the local storage. Then if that is successful, we can use the code query parameter and submit it to the authorization server along with the code_verifier from the local storage.
src\app\components\auth\auth.component.ts
import { HttpClient, HttpParams } from '@angular/common/http';
import { Component, OnInit } from '@angular/core';
import { ActivatedRoute } from '@angular/router';
import { LocalStorageService } from 'angular-2-local-storage';
import { environment } from 'src/environments/environment';


@Component({
    templateUrl: './auth.component.html',
    styles: []
})
export class AuthComponent implements OnInit {

    constructor(
        private activatedRoute: ActivatedRoute,
        private http: HttpClient,
        private storage: LocalStorageService
    ) {
    }

    ngOnInit() {
        this.activatedRoute.queryParams.subscribe(params => {
            if (params.code) {
                this.getAccessToken(params.code, params.state);
            }
        });
    }

    getAccessToken(code: string, state: string) {

        if (state !== this.storage.get('state')) {
            alert('Invalid state');
            return;
        }

        const payload = new HttpParams()
            .append('grant_type', 'authorization_code')
            .append('code', code)
            .append('code_verifier', this.storage.get('codeVerifier'))
            .append('redirect_uri', environment.oauthCallbackUrl)
            .append('client_id', environment.oauthClientId);

        this.http.post(environment.oauthTokenUrl, payload, {
            headers: {
                'Content-Type': 'application/x-www-form-urlencoded'
            }
        }).subscribe(response => {
            console.log(response);
        });
    }
}
For demonstration purposes we just log the response to the console. You can put these values to the local storage like we did on state and code_verifier and use it to make request to the resource server.
That is it for this tutorial. Thanks for reading!


Andres de la Cruz
September 21, 2020 at 12:15 am
Hi, thx for the post, is what i looking for, but i have a question about handle the send and reception of code challenge. which approach is better, handle it by backend or frontend?.
Nick Alcala
September 22, 2020 at 8:51 pm
Code challenge will be handled by laravel passport which uses php league/oauth2-server. In frontend though you will have to use the code verifier when getting the access token shown in “Getting an Access Token” section.
Dhivya
October 13, 2020 at 9:59 am
Can you please post the server code for http://api.tutorial.test/oauth/
Nick Alcala
October 13, 2020 at 12:12 pm
Maybe you can check this tutorial https://niceprogrammer.com/laravel-oauth-with-passport-and-dingo-api/ or this github repository https://github.com/nickalcala/laravel-oauth-passport-dingo-example.