Express JS OAuth 2 Server using oauth2-server package
Introduction
OAuth2-Server is quite a popular package for implementing OAuth authentication for Node JS but the examples provided on express-oauth-server on GitHub is outdated and does not work. In this tutorial we will create an OAuth 2 server using Express JS and test using postman. For database we will use Mongo DB with the help of Mongoose JS. The code for this tutorial can be downloaded from the GitHub repository.
Installation
To create a project template, we can use express-generator.
express -v hbs -c sass –git
npm install
npm i express-oauth-server mongoose –save
express-oauth-server is just a wrapper for the methods that oauth2-server provides. This also installs the oauth2-server package as a dependency.
Connecting to Database
For this tutorial we will use Mongo DB as a database but you can change this of course. First I will store my Mongo DB connection in a separate JavaScript file which I will call env.js.
module.exports = {
    isProduction: false || process.env.isProduction,
    mongoDbUrl: 'mongodb://localhost/oauth_server' || process.env.mongoDbUrl,
    salt: 'a5828e9d6052dc3b14a93e07a5932dd9' || process.env.salt
};
This is not required but it is helpful to have a central place to put environment or application variables. I also added isProduction and salt which I will use later.
To connect to Mongo DB, we can add this on app.js on the upper part of the code. Just make sure it is above where you actually need the connection.
// other codes are remove for brevity
app.use(express.static(path.join(__dirname, 'public')));

// Database
if (env.isProduction) {
    mongoose.connect(process.env.MONGODB_URI);
} else {
    mongoose.connect('mongodb://localhost/oauth', { useNewUrlParser: true });
    mongoose.set('debug', true);
}
mongoose.set('useCreateIndex', true);

let db = mongoose.connection;
db.on('error', console.error.bind(console, 'MongoDB error: '));
db.once('open', console.log.bind(console, 'MongoDB connection successful'));
Models
OAuth2-server requires an object or model with specific methods that it use internally. This model will also need the application’s user model so we need to create that too. Refer to https://oauth2-server.readthedocs.io/en/latest for the model specification.
User Model
This is a typical user model look like with helper methods for setting and validating password.
const mongoose = require('mongoose');
const crypto = require('crypto');
const env = require('../env');

let UserSchema = new mongoose.Schema({
    firstName: { type: String },
    lastName: { type: String },
    username: { type: String, unique: true },
    password: { type: String },
    email: { type: String, unique: true },
    verificationCode: { type: String },
    verifiedAt: { type: Date },
}, {
    timestamps: true,
});

UserSchema.methods.validatePassword = function (password) {
    let _password = crypto.pbkdf2Sync(password, env.salt, 10000,
        32, 'sha512').toString('hex');
    return this.password === _password;
};

UserSchema.methods.setPassword = function (password) {
    this.password = crypto.pbkdf2Sync(password, env.salt, 10000,
        32, 'sha512').toString('hex');
};

mongoose.model('User', UserSchema, 'users');
Access Token Model
For access token, authorization code, and client models we can just write it on the same JavaScript file. In my case I will put all of them on models/oauth.js.
Access tokens are related to the client and can be owned by a user for authorization and password grants.
let OAuthAccessTokenModel = mongoose.model('OAuthAccessToken', new mongoose.Schema({
    user: { type: mongoose.Schema.Types.ObjectId, ref: 'User' },
    client: { type: mongoose.Schema.Types.ObjectId, ref: 'OAuthClient' },
    accessToken: { type: String },
    accessTokenExpiresAt: { type: Date },
    refreshToken: { type: String },
    refreshTokenExpiresAt: { type: Date },
    scope: { type: String }
}, {
    timestamps: true
}), 'oauth_access_tokens');
Authorization Code Model
We need to store the authorization code for authorization code flow. OAuth2-server also requires the user and client model.
let OAuthCodeModel = mongoose.model('OAuthCode', new mongoose.Schema({
    user: { type: mongoose.Schema.Types.ObjectId, ref: 'User' },
    client: { type: mongoose.Schema.Types.ObjectId, ref: 'OAuthClient' },
    authorizationCode: { type: String },
    expiresAt: { type: Date },
    scope: { type: String }
}, {
    timestamps: true
}), 'oauth_auth_codes');
Client Model
Last but not the least is the client model. User model is also needed in this case since clients has to have a user.
let OAuthClientModel = mongoose.model('OAuthClient', new mongoose.Schema({
    user: { type: mongoose.Schema.Types.ObjectId, ref: 'User' },
    clientId: { type: String },
    clientSecret: { type: String },
    redirectUris: { type: Array },
    grants: { type: Array },
}, {
    timestamps: true
}), 'oauth_clients');
Now we can implement the methods required by OAuth2-server. These will be simple query and insert using Mongoose JS.
module.exports.getAccessToken = async (accessToken) => {

    let _accessToken = await OAuthAccessTokenModel.findOne({ accessToken: accessToken })
        .populate('user')
        .populate('client');

    if (!_accessToken) {
        return false;
    }

    _accessToken = _accessToken.toObject();

    if (!_accessToken.user) {
        _accessToken.user = {};
    }
    return _accessToken;
};

module.exports.refreshTokenModel = (refreshToken) => {
    return OAuthAccessTokenModel.findOne({ refreshToken: refreshToken })
        .populate('user')
        .populate('client');
};

module.exports.getAuthorizationCode = (code) => {
    return OAuthCodeModel.findOne({ authorizationCode: code })
        .populate('user')
        .populate('client');
};

module.exports.getClient = (clientId, clientSecret) => {
    let params = { clientId: clientId };
    if (clientSecret) {
        params.clientSecret = clientSecret;
    }
    return OAuthClientModel.findOne(params);
};

module.exports.getUser = async (username, password) => {
    let UserModel = mongoose.model('User');
    let user = await UserModel.findOne({ username: username });
    if (user.validatePassword(password)) {
        return user;
    }
    return false;
};

module.exports.getUserFromClient = (client) => {
    // let UserModel = mongoose.model('User');
    // return UserModel.findById(client.user);
    return {};
};

module.exports.saveToken = async (token, client, user) => {
    let accessToken = (await OAuthAccessTokenModel.create({
        user: user.id || null,
        client: client.id,
        accessToken: token.accessToken,
        accessTokenExpiresAt: token.accessTokenExpiresAt,
        refreshToken: token.refreshToken,
        refreshTokenExpiresAt: token.refreshTokenExpiresAt,
        scope: token.scope,
    })).toObject();

    if (!accessToken.user) {
        accessToken.user = {};
    }

    return accessToken;
};

module.exports.saveAuthorizationCode = (code, client, user) => {
    let authCode = new OAuthCodeModel({
        user: user.id,
        client: client.id,
        authorizationCode: code.authorizationCode,
        expiresAt: code.expiresAt,
        scope: code.scope
    });
    return authCode.save();
};

module.exports.revokeToken = async (accessToken) => {
    let result = await OAuthAccessTokenModel.deleteOne({
        accessToken: accessToken
    });
    return result.deletedCount > 0;
};

module.exports.revokeAuthorizationCode = async (code) => {
    let result = await OAuthCodeModel.deleteOne({
        authorizationCode: code.authorizationCode
    });
    return result.deletedCount > 0;
};
Here are some key points.
getUserFromClient– Only used on client credentials grant and we return empty object. This is so when securing a route like user registration, forgot-password, and etc. we don’t get any user from the request and think someone has actually logged in. For resources like account profile where we need a user to login, we user authorization grant or password grant.saveToken– We made the the user optional for client credentials grant. Then we convert the document to object to setaccessToken.userto an empty object since Mongoose only lets you set related columns to actual document. We also can’t just leave it to just null sinceOAuth2-serverwant’s the user property a truthy value.getAccessToken– On this method we just consider the client credentials that can have empty user.
OAuth Routes
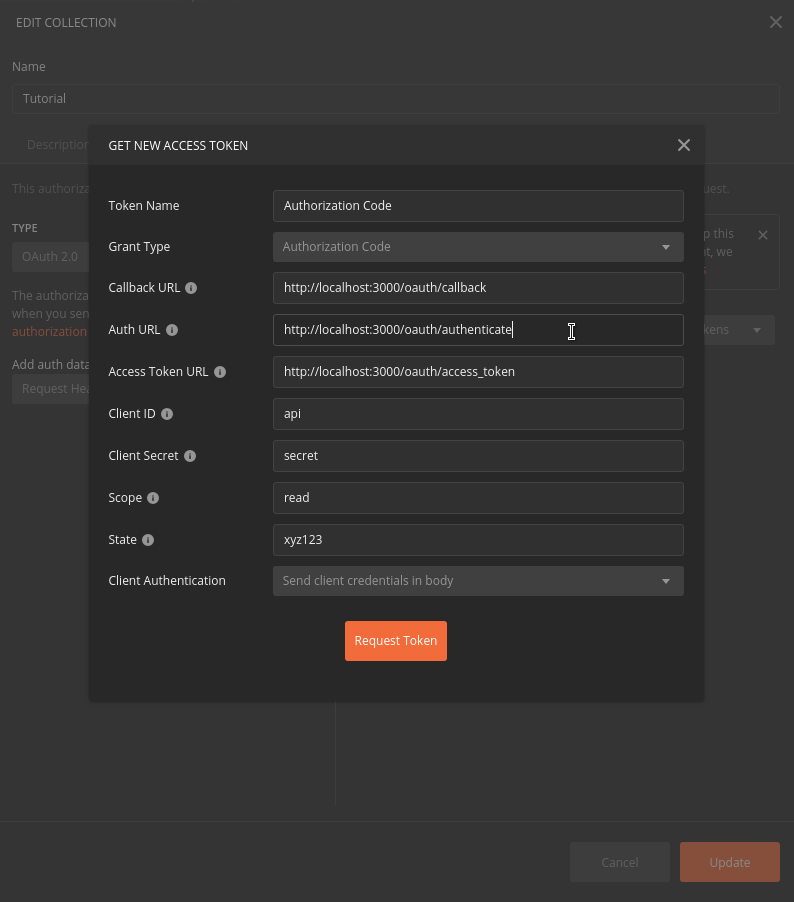
We will need to create three routes that will be used for authorization, client credentials, and password credentials grants. One of the route will also render a login page that when logged-in successfully will redirect the user back to their redirect URL for authorization code grant.
We can write the routes on routes/oauth.js.
const router = require('express').Router();
const OAuthServer = require('express-oauth-server');
const OAuthModel = require('../models/oauth');
const mongoose = require('mongoose');

let oauth = new OAuthServer({
    model: OAuthModel,
    debug: true
});

router.post('/oauth/access_token', oauth.token({
    requireClientAuthentication: { authorization_code: false }
}));

router.get('/oauth/authenticate', async (req, res, next) => {
    return res.render('authenticate')
});

router.post('/oauth/authenticate', async (req, res, next) => {

    let UserModel = mongoose.model('User');
    req.body.user = await UserModel.findOne({ username: req.body.username });

    return next();
}, oauth.authorize({
    authenticateHandler: {
        handle: req => {
            return req.body.user;
        }
    }
}));

module.exports = router;
- POST
/oauth/access_token– We setrequireClientAuthentication.authorization_codeto false so we don’t have to pass the client secret when getting the access token for authorization code grant. - GET
/oauth/authenticate– We just render a login page that posts to our next route. - POST
/oauth/authenticate– We login the user and pass it toOAuth2-server'sauthorize.
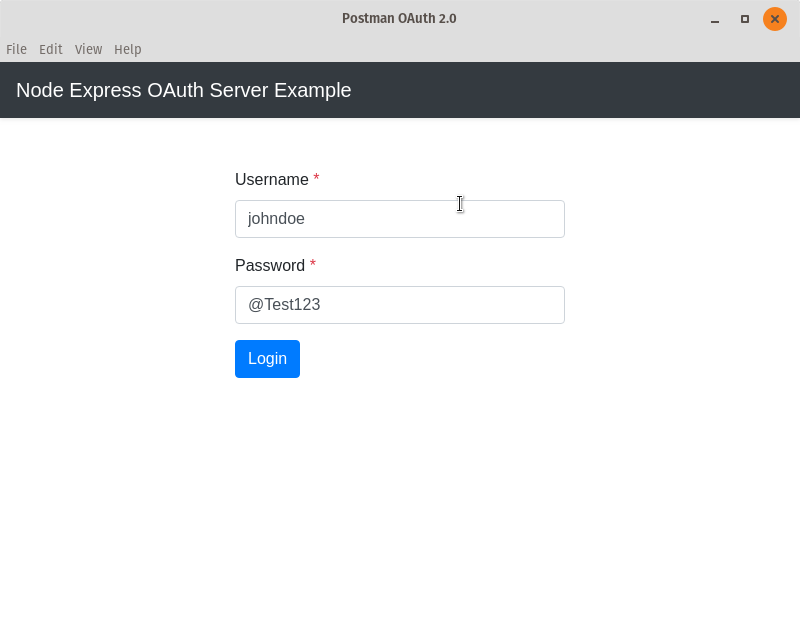
Here is the code for the login page that is named authenticate.hbs.
<div class="row">
    <div class="col-md-6 offset-md-3">
        <form method="POST">
            <div class="form-group">
                <label for="username">
                    Username
                    <span class="text-danger">*</span>
                </label>
                <input name="username"
                       id="username"
                       type="text"
                       class="form-control"
                       value="johndoe">
            </div>
            <div class="form-group">
                <label for="password">
                    Password
                    <span class="text-danger">*</span>
                </label>
                <input name="password"
                       id="password"
                       type="text"
                       class="form-control"
                       value="@Test123">
            </div>
            <button class="btn btn-primary">
                Login
            </button>
        </form>
    </div>
</div>
There is no “action” attribute since the goal is to post it to the same URL which is /oauth/authenticate.
We can now finally import our models and routes to app.js. This will be all the changes to app.js.
// Database
if (env.isProduction) {
    mongoose.connect(process.env.MONGODB_URI);
} else {
    mongoose.connect('mongodb://localhost/oauth', { useNewUrlParser: true });
    mongoose.set('debug', true);
}
mongoose.set('useCreateIndex', true);

let db = mongoose.connection;
db.on('error', console.error.bind(console, 'MongoDB error: '));
db.once('open', console.log.bind(console, 'MongoDB connection successful'));

require('./models/user');
require('./models/oauth');

// Routes
app.use(require('./routes/oauth'));
Trying it out
Here are some screenshots when testing using Postman. I inserted a sample user and an oauth client for that user. The sample code in references section at the bottom includes a registration page.
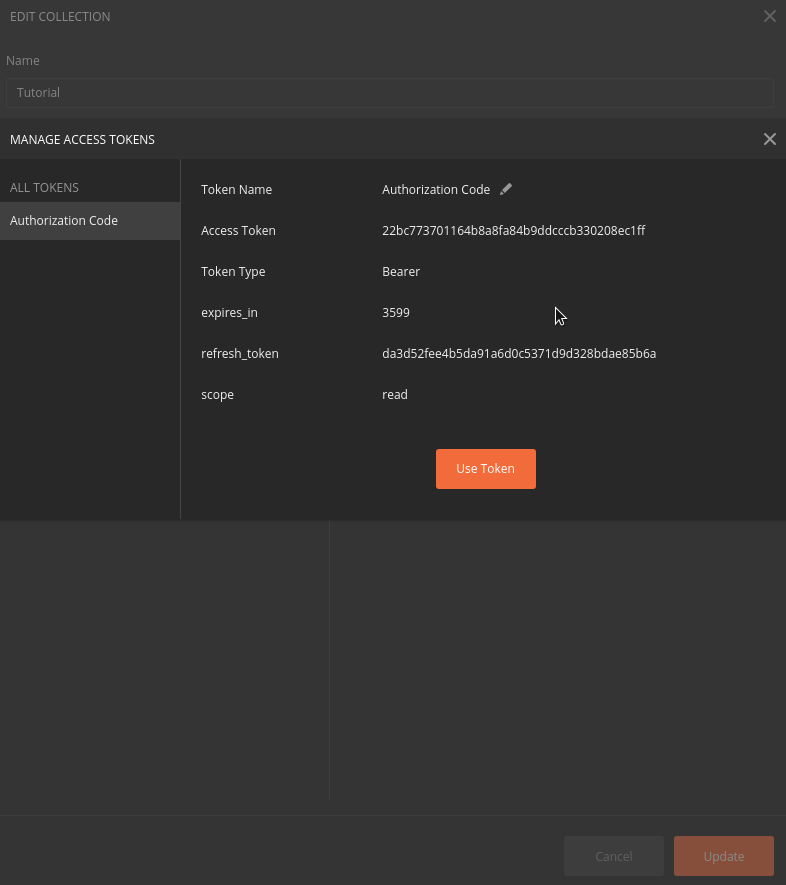
Authorization Code Grant
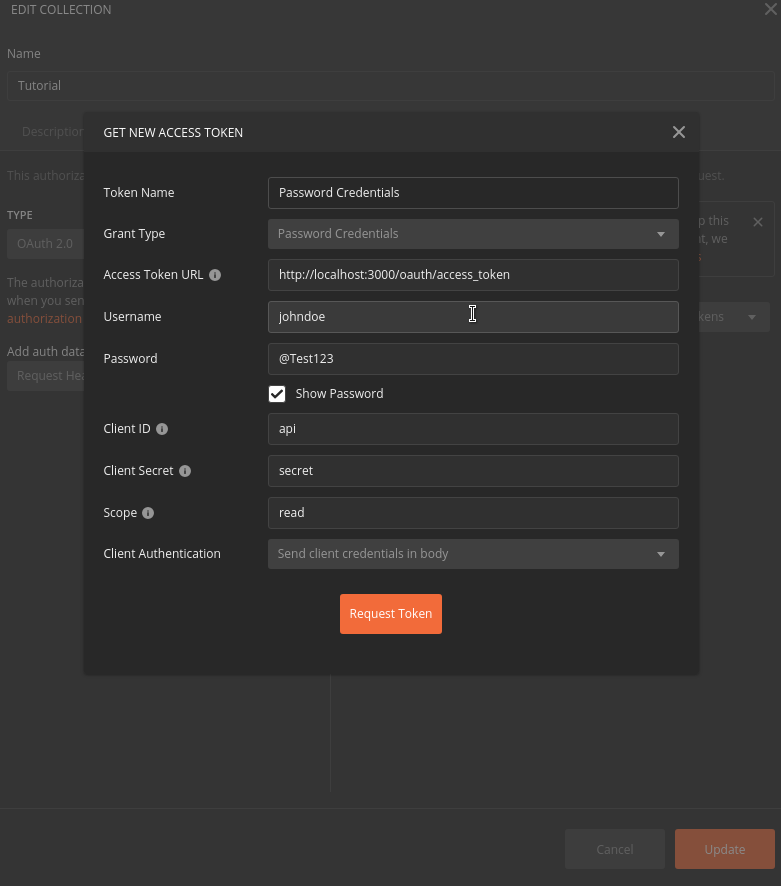
Password Credentials Grant

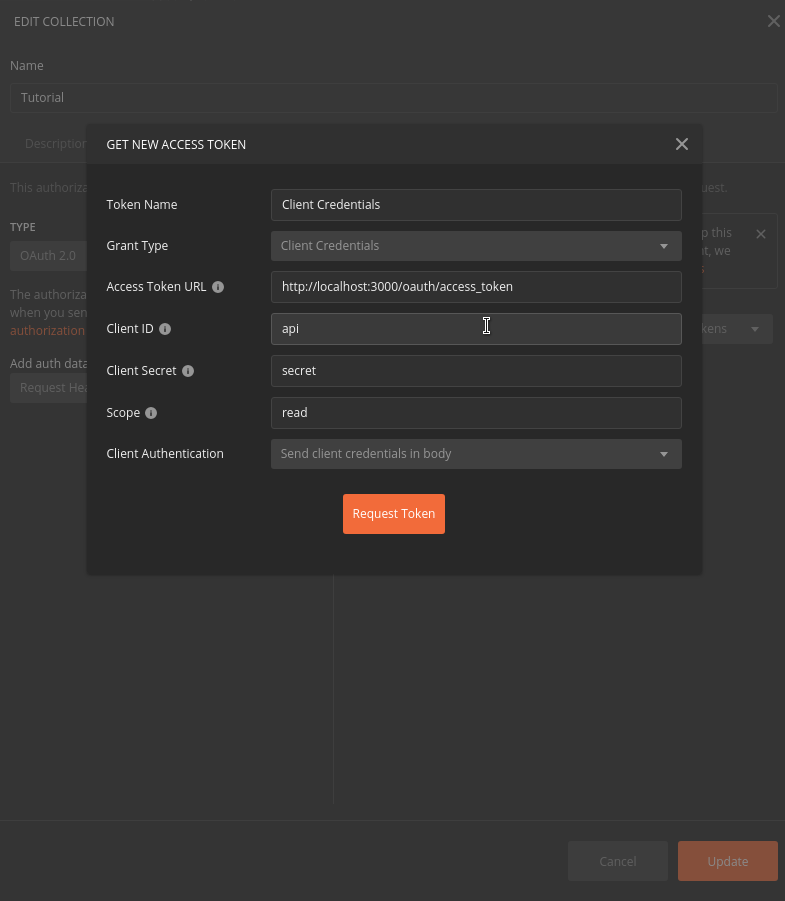
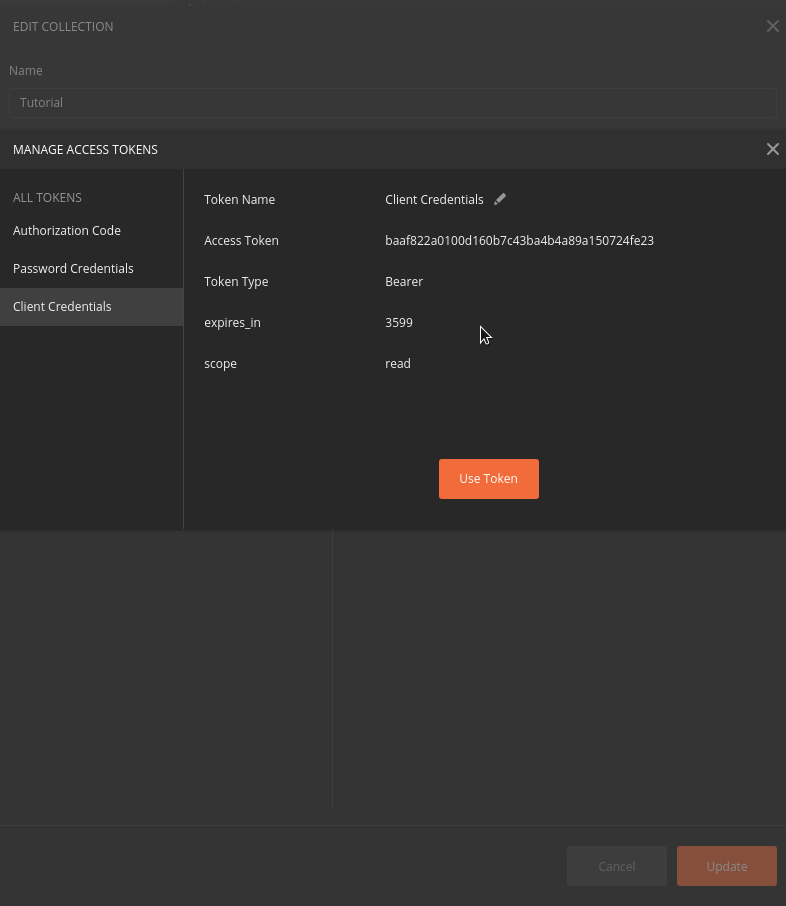
Client Credentials Grant
Securing a Route
Lastly, we will try securing a page. In our routes file we need to get an instance of the OAuth2-server so we can access its authenticate method which is a middleware.
const router = require('express').Router();
const OAuthServer = require('express-oauth-server');
const OAuthModel = require('../models/oauth');
let oauth = new OAuthServer({
model: OAuthModel,
useErrorHandler: true,
debug: true
});
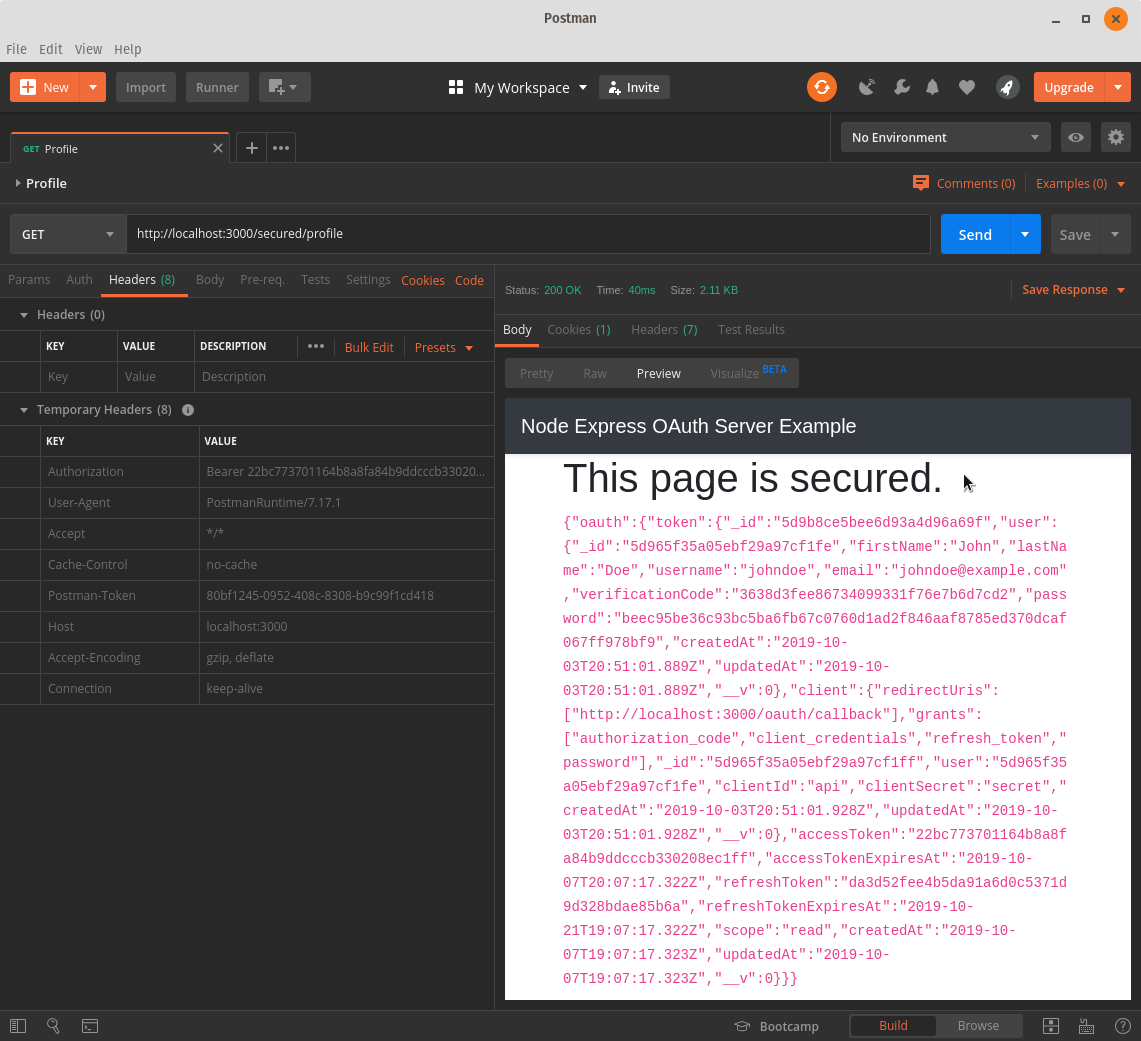
router.use('/secured/profile', oauth.authenticate(), (req, res) => {
return res.render('secured', { token: JSON.stringify(res.locals) });
});
secured.hbs
<h1>This page is secured.</h1>
<code>{{{token}}}</code>
Screenshots
Authorization Code Grant
User object is available.
Password Credentials Grant
User object is available.

Client Credentials Grant
User object is not available.

That is all for this tutorial. Thanks for reading!
Volodymyr
April 28, 2020 at 7:47 am
Thank you very much! You give me a valuable piece of the puzzle
Javier Constanzo
September 8, 2020 at 4:09 am
Thank you, you’re amazing
Mikolaj
January 30, 2021 at 9:55 am
When trying to login, I get “missing parameter: client id”
Nick Alcala
January 30, 2021 at 2:28 pm
It could be that somehow your client_id is not included or missing from the request.
Another thing you can do to debug it is put breakpoints on the handlers in the following lines:
– node_modules/express-oauth-server/node_modules/oauth2-server/lib/handlers/authorize-handler.js line 162
– node_modules/express-oauth-server/node_modules/oauth2-server/lib/handlers/token-handler.js line 120
These are the lines that are throwing these errors.
throw new InvalidRequestError('Missing parameter: `client_id`');Then you can check the
requestvariable.I hope that helps 🙂
Guilherme
March 6, 2021 at 4:35 pm
{“error”:”invalid_request”,”error_description”:”Missing parameter: `state`”}
How to fix?
Nick Alcala
March 7, 2021 at 7:43 am
Are passing state as seen here?
Screenshot
Guilherme
March 7, 2021 at 4:07 pm
I’m using in Alexa Skill Account Linking and works! But in Insomnia, appears error:
https://uploaddeimagens.com.br/images/003/117/639/original/Sem_T%C3%ADtulo-1.png?1615133194
Nick Alcala
March 7, 2021 at 6:51 pm
Try to put a random string in the state field in advanced options.
Video
Guilherme
March 7, 2021 at 10:46 pm
Works!! Thanks!!!!
Guilherme
March 8, 2021 at 1:37 am
Another question: By any chance, would you have an example of models with Sequelize (MySQL)?
Nick Alcala
March 8, 2021 at 5:14 am
Unfortunately I only have one for Laravel and none for node.
Edit: I would imagine it will be the same if you want to use mysql instead of mongodb.
Guilherme
March 8, 2021 at 6:20 pm
Ok, thanks! =)
James
June 28, 2021 at 4:12 pm
Thanks your tutorial. It works when I’m using the POSTMAN, but failed when using in my ‘passport-oauth2’. It will show the error: “{“statusCode”:401,”message”:”Unauthorized”}” in the last step. Here is my config in ‘passport-oauth2’:
authorizationURL : ‘http://localhost:3000/oauth/authenticate?client_id=api&redirect_uri=http%3A%2F%2Flocalhost%3A4000%2Fdiscord&response_type=code&scope=read’,
tokenURL : ‘http://localhost:3000/oauth/access_token’,
clientID : ‘api’,
clientSecret : ‘secret’,
callbackURL : ‘http://localhost:4000/discord’,
scope : ‘read’,
state : true
I’m using the same config OAuth the discord app, and it works correctly. It makes me so frustrated…
Nick Alcala
June 29, 2021 at 10:55 am
Mmm. Sorry I have not checked you particular issue but what you can do is check the logs in postman and see how the request differs from your web app’s request.